We will build our Chatbot on a Facebook Page. Thus, create a Facebook Page first!
- Log in your Facebook Account.
- Click the dropdown menu on the top right hand corner.
Step 2: Create a Facebook Developer Account
- Click Create Page to create a new page and choose Company, Organization or Institution.
- In the Choose a Category dropdown menu, select Education.
- Fill in the Company Name with “TestBot” and then click Get Started.
- Now the “TestBot” Page is created.
- Get Started with your Facebook Account.
- Click Create App ID
- Set the Display Name as “Hello World” and choose Apps for Messenger on Category.
- After you logged in your account, select Messenger on the left menu.
- Find the “Token Generation” section, select TestBot on Page, and connect to Facebook account again.
- Then you can get your “Page Access Token”. Keep it for later usage.
- Open the helloworld folder in IntelliJ.
- Alt+f12 to open a terminal on IntelliJ.
- Click the Get in Touch and select Send Message. Then turn on Turn on Instant Replies.
- Fill in the text box with any message such as “Hello, this is TestBot! How can I help you?”
- Click Add Button. Then you will see a “Send Message” button on the right hand side.
- Hover on “Send Message” button, and then select Test Button.
Step 4: Transform localhost into https URL
- Download ngrok from https://ngrok.com/
- Extract the zip file ngrok-stable-windows-amd64.zip and execute ngrok.exe to open a ngrok terminal.
- (On Linux or OSX) you may need to unzip ngrok from a terminal with the following command.
We use Facebook Developer as a channel to direct the message from Facebook to our chatbot (build it later). Therefore, we need to connect our Facebook Page with Facebook for Developer.
Step 3: Add Plugin on IntelliJ
Now we move to IntelliJ to construct our chatbot to echo the guest’s input.
Step 5: Create the Facebook Bot
cd bot/src
npm init --yes
npm install fb-bot-framework --save
npm install express --save
- Return to the facebook developer website.
- Select the Messenger from the left bar.
- Find the “Webhooks” section and click Setup Webhooks.
- In the “New Page Subscription” window, Paste the https URL on the Callback URL and add /webhook at the back. Tick the box of messages, messaging_postback and messaging_optins.
Congratulations! You have made your own Facebook Bot! Open Source Project
- Click Verify and Save and the window would be closed.
- Return to “Webhooks” Section, select TestBot on Select a Page and click Subscribe.
- The Facebook Bot is done.
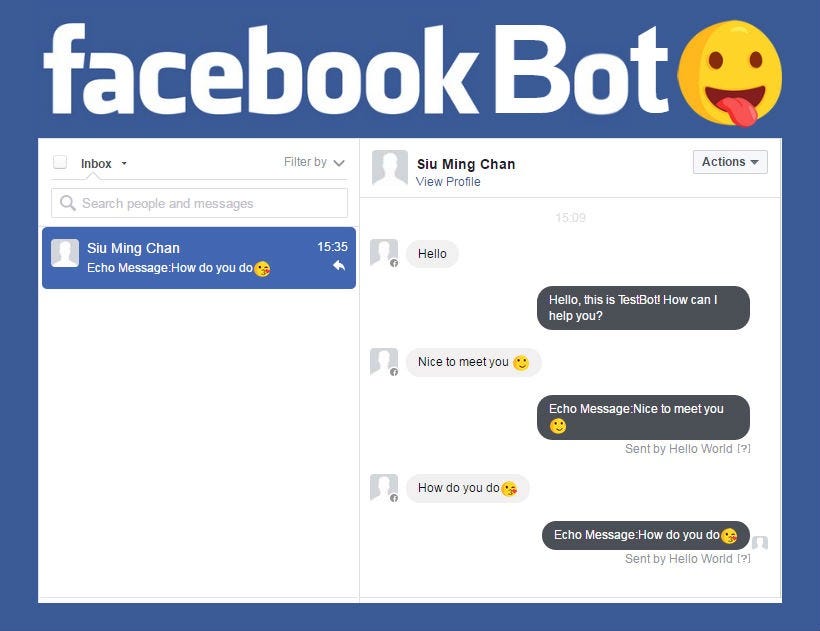
- Return to your “TestBot” Facebook page, open the page’s Inbox.
- When you send a “Hello” message, the page will echo your message as “Echo Message: Hello”.
More information on fb-bot-framework plugin. https://www.npmjs.com/package/fb-bot-framework
var express = require('express');// Initialize// Setup Express middleware for /webhook// Setup listener for incoming messages//Make Express listening
var app = express();
var bot = new FBBotFramework({
app.use('/webhook', bot.middleware());
bot.on('message', function(userId, message){
app.listen(3000);
bot.sendTextMessage(userId, "Echo Message: " + message);
});
app.get("/", function (req, res){
res.send("hello world");
});
page_token: "THIS_IS_PAGE_TOKEN",
verify_token: "THIS_IS_VERIFY_TOKEN"
});
var FBBotFramework = require('fb-bot-framework');
When the Facebook Bot receives a message, it will be sent to the server running on the endpoint url specified on index.js. However, the server will run locally (no URL). Therefore, you will use ngrok which make a local server run online.
$ unzip /path/to/ngrok.zip
./ngrok http 3000
Now, we have enough tokens for Facebook Developer to make connection between Facebook Page and the Chatbot. Just fill in the information!
node index.js
Our Facebook Bot is striving for further improvement from each of your generous contributions. Please join GitHub project to bring this project further.
Originally published at https://medium.com on March 17, 2017.
Leave a Reply